To ensure the quality, ease of use, and long life of plastic windows, all windows, external sills and internal sills must be properly installed. Installers must carefully consider the rules of construction physics. All windows and doors of a building should be similar in appearance and free from major structural and colour differences that detract from the overall look.
This guide has been prepared for the installation of windows and doors manufactured by AS PLASTMERK. The guide has been prepared in accordance with instructions compiled by SCHÜCO INTERNATIONAL KG and other window installation practices.
1. General
Installed and finished windows must be:
– windproof;
– rainproof;
– secured maximally against heat loss;
– sound-insulating;
– resistant to UV radiation;
– secured against ingress of moisture in the indoor air.
Figure 1.
Forces that affect a window
In addition to the above, window performance is affected by:
– the elasticity of the framing profile;
– the number and location of fixings;
– the difference between indoor and outdoor temperatures;
– the linear expansion of the framing.
2. Installation of mounting brackets
All forces affecting the window must be transferred safely to the structure.
This is achieved through the use of the mounting brackets supplied with your windows. The brackets must be fixed to the wall structure by means which are suitable to the material of the wall (screw and wall plug, nail plug, impact nail, etc.).
Figure 2. Spacing of window fixing anchors
3. Securing the window
The window is secured using support blocks, which must be placed in such a way so as not to unduly affect the flexibility of the window. Support blocks are made of impregnated wood or plastic. The support blocks must not be removed during any other work. Other types of multi-section windows should be secured according to the rules of securing the larger window section.
Figure 3. Securing the window
4. Joints
After the window is secured, wedged, and fixed, the joints must be sealed. PLASTMERK uses spray foam for sealing windows.
The joint must receive and balance any movements from the building.
On the outer side, the joint must be protected against the ingress of water. If necessary, this can be achieved through the use of cover plates, sealants, seals, etc.
On the inner side, the joint must be protected against the ingress of indoor moisture.
When determining the width of the joint, keep in mind that PVC materials have a large coefficient of linear expansion: white materials up to 1.6 mm/m and coloured materials up to 2.4 mm/m.
The table below shows the minimum joint widths for different window sizes.
|
Window width, height |
up to 1.5 m |
1.5–2.5 m |
2.5–3.5 m |
3.5–4.5 m |
|
White PVC |
10 |
15 |
20 |
25 |
|
Coloured PVC |
15 |
20 |
25 |
30 |
Figure 4. Wall and window joint diagram
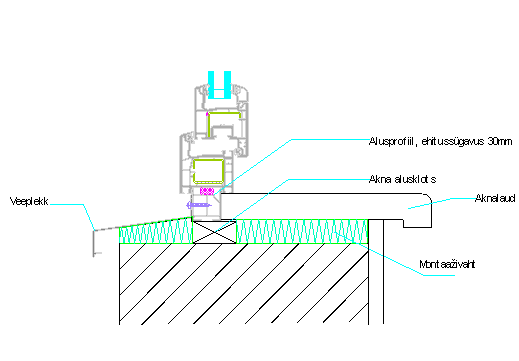
5. Installation of internal and external sills
The bottom part of the window is fitted with a 30 mm auxiliary profile for mounting the internal and external sill. The external sill is fixed with screws or blind rivets spaced approx. 300 mm apart.
The external sill should extend over the brickwork by at least 30 mm, and the upturned edges should overlap with the frame or brickwork by at least 15 mm. It is recommended to fill the space between the external sill and the brickwork with polyurethane foam to provide thermal insulation and fixing power.
The external sill should have a slope of at least 15o. A slope of more than 30o will prevent rainwater from splashing onto the window.
The internal sill is installed under the frame with a small gap between the sill and the base profile. The internal sill can also be installed directly against the frame, using silicone. The space under the internal sill is filled with polyurethane foam. Prior to this, the sill must be aligned and secured.

Figure 5. External and internal sill installation diagram
If you have any questions about our windows and installation, please contact one of our sales offices or distributors. See also: Corona CT 70 plastic windows


